A Sidebar with collapsable sub-views for OSX in Swift
This is a long post so a table of content:
- Getting Started
- The DisclosureViewController
- Creating the view controller for the main view
- Creating the panel views
- Putting it all together in the AppDelegate and MainMenu.xib
OK, enough of this prevarication, time for some Swift Programming.
I’ve been working for a while on an application for OSX that needed a sidebar with collapsable sub-views. I wanted the sub-views to open and close when I clicked on a disclosure triangle: a bit like the formatting bar in Pages:
Closed

Open
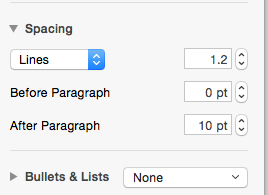
A trawl through Apple’s code samples found nothing written Swift but I found InfoBarStackView which produces this:
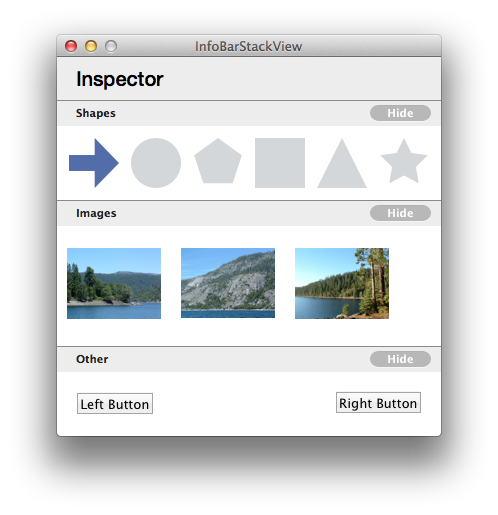
I wanted something that looked like this:
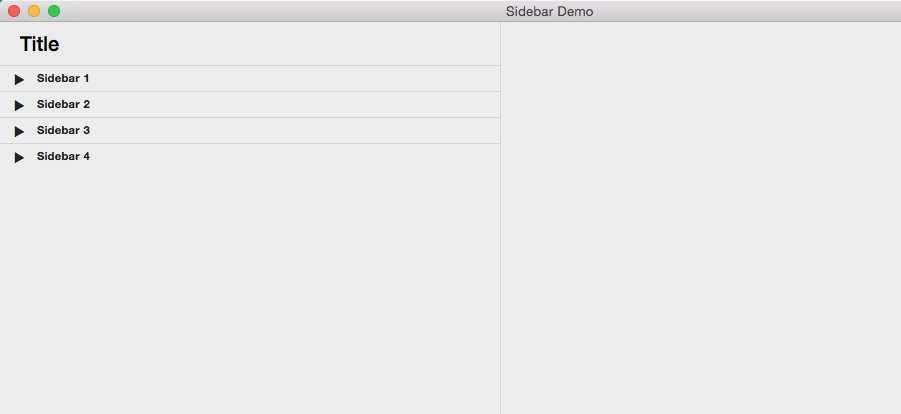
InfoBarStackView was at least dealing with some of the same issues. The main problem was that it was in Objective C rather than Swift. I know I could have combined Objective C with Swift and saved myself a lot of grief but where is the fun in that?
Getting Started
First of all we need to create a project to contain everything. Fire up Xcode and create a new OSX project:
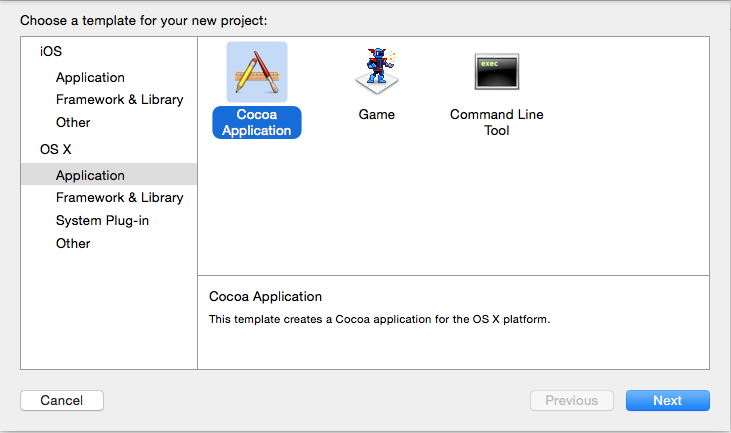
On the second screen
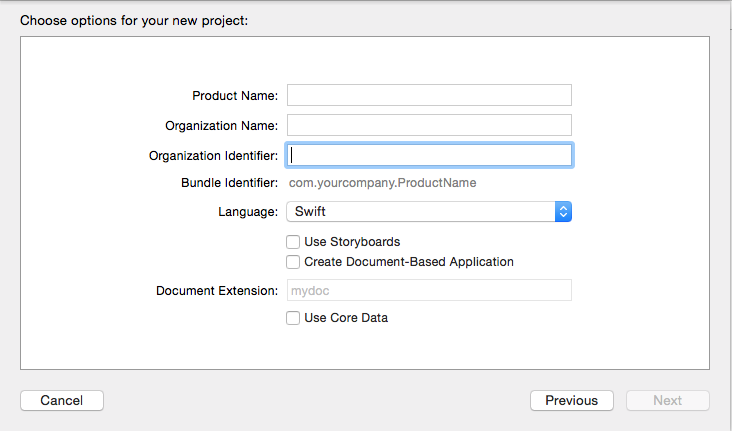
make sure that Language is set to Swift and Use Storyboards is not checked. It may be possible to achieve the same result with a Storyboard based project but I haven’t figured out how.
The DisclosureViewController
Creating the DisclosureViewController
Add a Cocoa Class file to the project
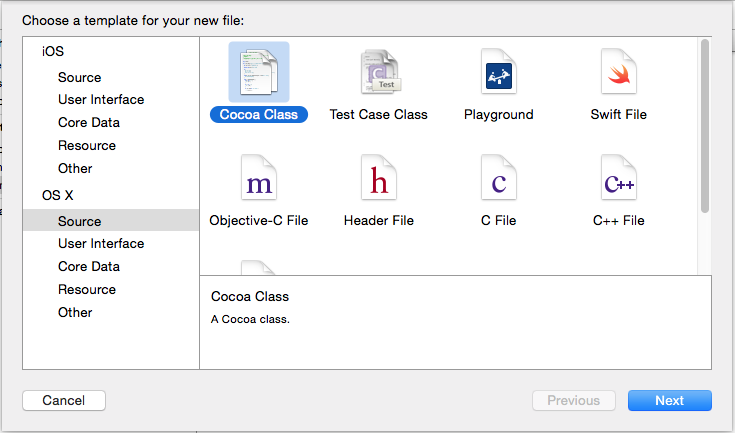
called DisclosureViewController based on NSViewController making sure that Also create XIB file for user interface is checked and that *Language is set to Swift
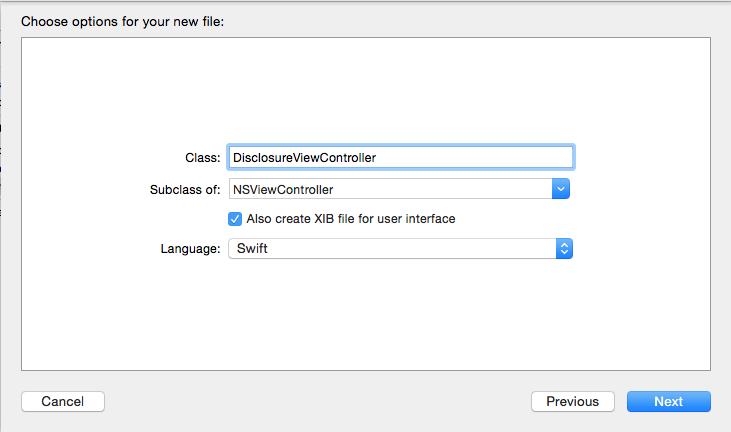
The base code of the class will look something like this
//
//  DisclosureViewController.swift
//  Sidebar Demo


import Cocoa

class DisclosureViewController: NSViewController {

    override func viewDidLoad() {
        super.viewDidLoad()
        // Do view setup here.
    }

}
The XIB file DisclosureViewController.XIB will look like this:
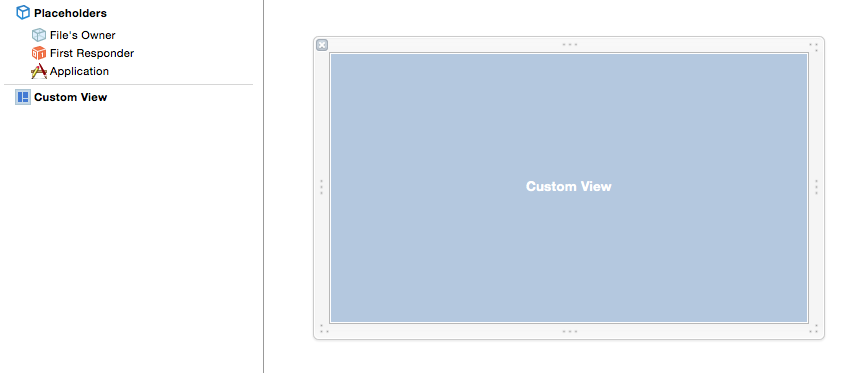
Add a custom view with a height of 26 pixels inside of and at the top of the already created view; this is the header view. Add a horizontal line inside of and at the bottom of the header view. Add a 17x17 square button at the left of the header view and give it a blank title, uncheck Bordered and set its font to System Bold Small; this will be the disclosure button. Add a tlabel to the right of the disclosure button, set its font to System Bold Small. The Xib file should now look something like this:
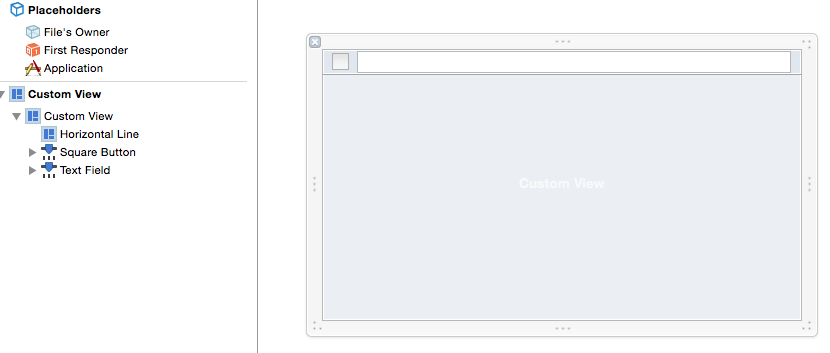
For each of the views, uncheck Translates Mask into Constraints
Add the following to the DisclosureViewController.swift file just under the class declaration :
@IBOutlet weak var panelView: NSView!               // the view being shown
@IBOutlet weak var titleTextField: NSTextField!     // the title of the disclosed view
@IBOutlet weak var disclosureButton: NSButton!      // the hide/show button
@IBOutlet weak var headerView: NSView!              // the header title section of this view controller
Leave the first of these outlets unlinked (you’ll see its purpose later). Link the other outlets to the appropriate parts of the DisclosureViewController.xib.
Providing a means of communicating between the views
We’ll end up needing to communicate between the various view controllers, so I’ve added a link to the Application Delegate:
var ad:AppDelegate!Providing a title for the panel
The easiest way to provide a title for the panel is to give a title to the view when creating it and then populating the titleTextField with it. Add this code to DisclosureViewController.swift:
override var title: String!  {
    get {
        return super.title
    }
    set {
        super.title = title
        titleTextField.stringValue = title
    }
}
This almost gets you there but not quite. You also need to set up a binding between the titleTextField and the title. To do this control-drag from the text field in the xib file to the point in DisclosureViewController.swift where var title:String! is highlighted then let release the mouse button. The binding dialog will appear:
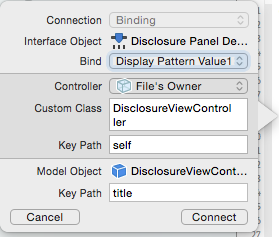
Change the bind field to read Value:
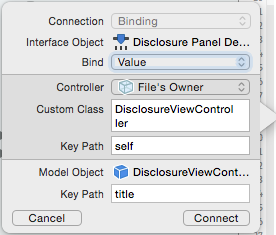
and click on the Connect button.
Setting constraints for the Disclosure View
The opening and closing of the disclosure view works by adjusting the constraints of the view. However we need to make sure that the view has been created before we try to add the constraints. The next bit of code is quite messy, but I haven’t found a better way to do it yet.
In DisclosureViewController.swift add this to viewDidLoad() after super.viewDidLaod:
self.panelView.removeFromSuperview()
self.view.addSubview(self.panelView)

// the header containing the title and the disclosure button will be gray by default
// set the background of the disclosed part of the view to white (or whatever other colour you want)
self.panelView.wantsLayer = true
self.panelView.layer?.backgroundColor = NSColor.whiteColor().CGColor

// add horizontal constraints
var d1: NSMutableDictionary = NSMutableDictionary()
d1.setValue(panelView, forKey: "_panelView")
self.view.addConstraints(NSLayoutConstraint.constraintsWithVisualFormat("H:|[_panelView]|", options: NSLayoutFormatOptions.allZeros, metrics: nil, views: d1))

// add vertical constraints
var d2: NSMutableDictionary = NSMutableDictionary()
d2.setValue(panelView, forKey: "_panelView")
d2.setValue(self.headerView, forKey: "_headerView")
self.view.addConstraints(NSLayoutConstraint.constraintsWithVisualFormat("V:[_headerView][_panelView]", options: NSLayoutFormatOptions.allZeros, metrics: nil, views: d2))
We need to add two final properties to our class. The first will hold the constraint that will be used when opening and closing the panel:
var closingConstraint: NSLayoutConstraint!The final property will record whether the panel is closed:
var isClosed:Bool!Adding functionality to the Disclosure View
Finally we add the last three functions to our class. Firstly add awakeFromNib() which will be called automatically when the view loads:
override func awakeFromNib() {
    // don't do anything until isClosed is initialised
    if let x = self.isClosed{
        openDisclosure(self,open:false,onlyOneOpen:false)
        if isClosed == false{
            openDisclosure(self,open:true,onlyOneOpen:false)
        }
    }
}
This makes sure that the panel is closed or opened according to the value of the isClosed property.
Secondly add the action toggleDisclosure:
@IBAction func toggleDisclosure(sender: AnyObject) {
    // called when the disclosure button is pressed
    if (self.isClosed == true) {
        openDisclosure(sender,open:true,onlyOneOpen:true)
    } else {
        openDisclosure(sender,open:false,onlyOneOpen:true)
    }
}
Control drag from the disclosure button in DisclosureViewController.xib to this function. Clicking on the button will call the openDisclosure function with the appropriate parameters.
Finally add the openDisclosure function:
func openDisclosure(sender: AnyObject, open:Bool, onlyOneOpen:Bool){
    ad = NSApplication.sharedApplication().delegate as AppDelegate
	if (open==false){
		// close an open panel
		var distanceFromHeaderToBottom:CGFloat = NSMinY(self.view.bounds) - NSMinY(self.headerView.frame)

		if let cc = self.closingConstraint{
			// if the closing contraint has been initialised, no need to do anything
		} else {
			// The closing constraint is going to tie the bottom of the header view to the bottom of the overall disclosure view.
			// Initially, it will be offset by the current distance, but we'll be animating it to 0.
			self.closingConstraint = NSLayoutConstraint(item: self.headerView, attribute: NSLayoutAttribute.Bottom, relatedBy: NSLayoutRelation.Equal, toItem: self.view, attribute: NSLayoutAttribute.Bottom, multiplier: 1, constant: distanceFromHeaderToBottom)
		}
		self.closingConstraint.constant =  distanceFromHeaderToBottom
		self.view.addConstraint(self.closingConstraint)

		NSAnimationContext.runAnimationGroup({ context in
		context.timingFunction = CAMediaTimingFunction(name: kCAMediaTimingFunctionEaseInEaseOut)
		// Animate the closing constraint to 0, causing the bottom of the header to be flush with the bottom of the overall disclosure view.
		self.closingConstraint.animator().constant = 0
		self.disclosureButton.title = "►"
		}, completionHandler:{
			self.isClosed = true
		})
	}
	else
	{
		// open a closed panel
		NSAnimationContext.runAnimationGroup({ context in
			context.timingFunction = CAMediaTimingFunction(name: kCAMediaTimingFunctionEaseInEaseOut)
			// Animate the closing constraint from 0, causing the panel to open.
			self.closingConstraint.animator().constant -=  self.panelView.frame.size.height
			self.disclosureButton.title = "▼"
			}, completionHandler:{
				self.isClosed = false

				// Set the focus to the appropriate input field if required - replace "firstControl" with the name of
				// the control from each panel that you want to have the focus when the panel is opened
				/*
				if self === self.ad.sidebar1{
				    self.ad.window.makeFirstResponder(self.ad.sidebar1.firstControl)
				}
				if self === self.ad.sidebar2{
				    self.ad.window.makeFirstResponder(self.ad.sidebar2.forstControl)
				}
				if self === self.ad.sidebar3{
				    self.ad.window.makeFirstResponder(self.ad.sidebar3.firstControl)
				}
				if self === self.ad.sidebar4{
				    self.ad.window.makeFirstResponder(self.ad.sidebar4.firstControl)
				}
				*/

		})

		if (onlyOneOpen == true){
		   // close other bars
			// adjust this segment dependant on the number of panels you have
			if ad.sidebar1 === self {
				ad.sidebar2.isClosed = false
				ad.sidebar2.toggleDisclosure(sender)
				ad.sidebar3.isClosed = false
				ad.sidebar3.toggleDisclosure(sender)
				ad.sidebar4.isClosed = false
				ad.sidebar4.toggleDisclosure(sender)
			}
			if ad.sidebar2 === self {
				ad.sidebar1.isClosed = false
				ad.sidebar1.toggleDisclosure(sender)
				ad.sidebar3.isClosed = false
				ad.sidebar3.toggleDisclosure(sender)
				ad.sidebar4.isClosed = false
				ad.sidebar4.toggleDisclosure(sender)
			}
			if ad.sidebar3 === self {
				ad.sidebar1.isClosed = false
				ad.sidebar1.toggleDisclosure(sender)
				ad.sidebar2.isClosed = false
				ad.sidebar2.toggleDisclosure(sender)
				ad.sidebar4.isClosed = false
				ad.sidebar4.toggleDisclosure(sender)
			}
			if ad.sidebar4 === self {
				ad.sidebar1.isClosed = false
				ad.sidebar1.toggleDisclosure(sender)
				ad.sidebar2.isClosed = false
				ad.sidebar2.toggleDisclosure(sender)
				ad.sidebar3.isClosed = false
				ad.sidebar3.toggleDisclosure(sender)
			}
		}

	}

}
Creating the view controller for the main view
Create a new class for the main view controller based on NSViewController. Don’t create a XIB when you add it, your going to put its view in MainMenu.xib. I’ve called my class RightViewController because I’m going to have it on the right-hand side of the application. In this demo I’m not going to add any functionality to this view controller.
Creating the panel views
Create as class as a subclass of DisclosureViewController for each panel you want to create. Don’t create XIBs when you create the class the UI is going to be in MainMenu.xib. I called my classes: sideVC1, sideVC2, sideVC3 and sideVC4
Putting it all together in the AppDelegate and MainMenu.xib
The AppDelegate.swift file is where the application is stitched together. All the UI is going to go in MainMenu.xib
Building MainMenu.xib
There are quite a few steps to this. You will need to follow them carefully.
- Drag a View Controller into MainMenu.xib and set its class to NSSplitViewController
- Drag a Custom View into MainMenu.xib, control-drag to it from the NSSplitViewController and set the outlet to
view. Give it a label ofSplitView - Drag a Stack View into the view created at step 2
- Drag in a View Controller for the main view and set its label appropriately and set its class to the one you created earlier - I labelled mine
RightVCand set its class toRightViewController - Drag in a Custom View for the main view and set its label value. I called mine
Right View. Control drag to it from the view controller added in step 4 and set the outlet toview - Drag in a Custom View for the title that will appear above the side panels. Set its label. I called mine
Left Title View. UncheckTranslates Mask into Constraints. Drag a Label to the view and set its Title to the text you want to appear. In the demo it just says “Title”. Set Leading to Leading, Top To Top and Centre Y to Centre Y constraints between the view and the label - Drag in a View Controller for the first of your panels. Set its label. I called mine
sidebarVC1. Set its class to the class that you created for it - in my casesideVC1. Give the view controller a title (i called mine Sidebar 1) and a NibName of DisclosureViewController - Drag in a Custom View for the first panel and label it. I called mine sidebar1View. Size it to the appropriate width and height. Uncheck
Translates Mask into Constraints. Set constraints for the width and height. Control drag to it from the view controller created in step 7 and set the outlet topanelView. - Repeat steps 7 and 8 for each of the other panels (they can have different heights but they should all be the same width) naming them and setting their classes to the appropriate values (in my case
sideVC2,sideVC3andsideVC4) - Drag in a View Controller which will control the stack of panels. Label it. I called mine
StackViewController. Control drag from here to the stack view added at step 3 - NB the stack view, not its parent split view - and set the outlet toview.
Adding to AppDelegate.swift
Add these outlets to AppDelegate.swift, below the window outlet
@IBOutlet weak var leftTitle: NSView!

@IBOutlet weak var sidebar1: sideVC1!
@IBOutlet weak var sidebar2: sideVC2!
@IBOutlet weak var sidebar3: sideVC3!
@IBOutlet weak var sidebar4: sideVC4!

@IBOutlet weak var mySplitViewController: NSSplitViewController!
@IBOutlet weak var myStackViewController: NSViewController!
@IBOutlet weak var myStackView: NSStackView!
@IBOutlet weak var rightViewController: RightViewController!
Link the first outlet to the view created in step 6 above.
Link the next group of outlets, the view controllers for the panels, (which you should give the same names and classes as you previously specified) to the view controllers you created in steps 7 and 9.
Link the next outlet to the view controller to the view controller created in step 2
Link the next outlet to the view controller created in step 10.
Link the next outlet to the view created in step 3
Link the final outlet to the view controller created in step 4.
Add this to applicationDidFinishLaunching
// set whether panels are initially open
self.sidebar1.isClosed = true
self.sidebar2.isClosed = true
self.sidebar3.isClosed = false
self.sidebar4.isClosed = false

// put the panels into the stack
myStackView = NSStackView(views: [
	self.leftTitle,
    self.sidebar1.view,
    self.sidebar2.view,
    self.sidebar3.view,
    self.sidebar4.view
])

// align the left edges of the panels
myStackView.alignment = NSLayoutAttribute.Left

// no spacing between the panels
myStackView.spacing = 0

// point the view controller at the stack
myStackViewController.view = myStackView

// add the stackview and the right view to the splitview
mySplitViewController.addSplitViewItem(NSSplitViewItem(viewController: myStackViewController))
mySplitViewController.addSplitViewItem(NSSplitViewItem(viewController: rightViewController))
mySplitViewController.splitView.adjustSubviews()

// point the application's window at the split view
self.window.contentView = mySplitViewController.splitView
##Next Steps The apps mechanics of opening and closing the panels should now work OK. Now you can add UI and functionality to the various views and view controllers.
Posted in Programming with : OSX, Swift

